Name Manager
Use the Name Manager dialog box to work with all the defined names in a workbook.
Please read Working with Named Ranges and Variables for differences to variables.
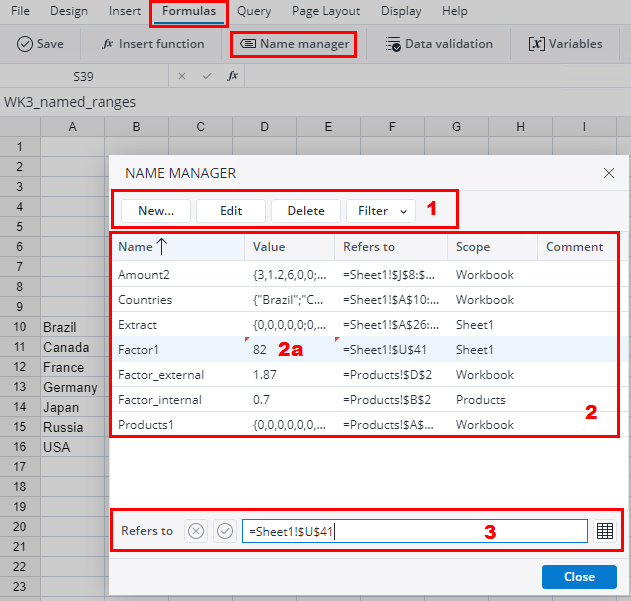
To open the NAME MANAGER dialog box, select Formulas in a spreadsheet and click Name manager:
Area (1)
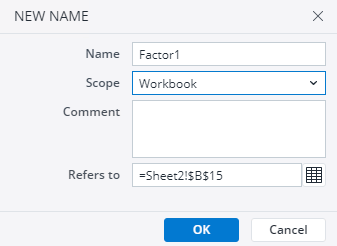
The button New... opens the NEW NAME dialog:

Entries in all fields (except for the Comment field) are mandatory.
The scope of a named range can be the whole current workbook or only one of its sheets. This decides where the name is known. Workbook is the default entry when you create a new named range.
In the field Refers to you can enter a spreadsheet range, a constant, or a formula.
To enter or to change a spreadsheet range, click Select range  , select the cells on the worksheet,
and then click End select range:

To enter a constant, type = (equal sign) and then type the constant value.
To enter a formula, type = and then the formula.
The button Edit opens the EDIT NAME dialog.
Here you can edit the same fields as in NEW NAME dialog except the Scope field.
If you modify a defined name, all uses of that name in the workbook will also change.
The button Delete deletes the marked name(s) in Area (2) without further questions.
You can select more names by doing one of the following:
- To select more than one name in a contiguous group, click the first name, then press SHIFT and click the last name.
- To select more than one name in a non-contiguous group, press CTRL and click the mouse button for each name.
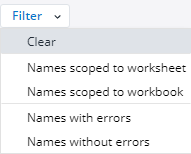
Use the commands in the Filter dropdown list to quickly display a subset of names:

|
Clear |
Deselects a selected filter. |
|
Names Scoped to Worksheet |
Displays only those names that are local to a worksheet. |
|
Names Scoped to Workbook |
Displays only those names that are global to a workbook. |
|
Names with Errors |
Displays only those names with values containing errors (such as #REF, #VALUE, or #NAME). |
|
Names Without Errors |
Displays only those names with values that do not contain errors. |
Area (2)
Here you see the defined names in tabular form.
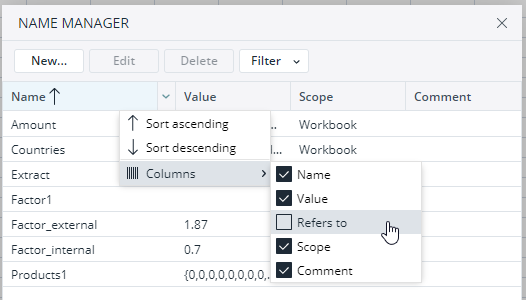
Click the column header to sort the list in ascending or descending order.
Furthermore, with the check/uncheck options you can decide which columns should be displayed in the table:
To automatically size the column to fit the longest value in that column, double-click the right side of the column header.
(2a): After you edit a row in this dialog, small red triangles will indicate the changes that have not been saved.
Area (3)
"Refers to" shows the reference for the selected name. You can quickly edit the range of a name by modifying the details in the Refers to box. After making the changes, you can save or discard them by clicking the corresponding buttons in front of the field.
To finish and return to the worksheet, click Close.
Updated July 3, 2025

