Creation and Handling of Dimension Elements
This article walks you through the creation of elements, their types, and how you can consolidate elements. For these actions we create a new dimension called “Customers” in the database “Demo”.
Select Dimensions in the hierarchy structure of the database “Demo” and click the button Add dimension. In the following dialog enter the name “Customers” and click OK to finish. Then click on the dimension, and the Elements tab opens. Click on the button Add element to create a new element.
For this example, create the element “Miller LLC”, then create the element “Total”. Next, create the element “Smith Corp”, selecting “Total” as the parent element. During the element creation, you can use the tab key on your keyboard to navigate to the Parent Element column to make changes to the element:
Click on the expand/collapse button to the left of the “Total” element to view or hide the element’s children.
Select the element “Smith Corp”, then hit the enter key on your keyboard to create the next element, which will automatically be a child of “Total”. Name this element “Meyer Ltd”.
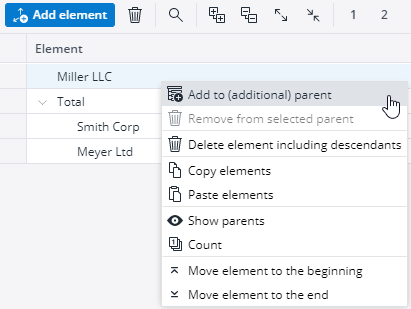
Now right-click “Miller LLC” and select Add to (additional) parent from the context menu:
Select "Total" as parent element.
Elements can be added to one or to more than one consolidated element, making different views of a dimension possible. These structures are often called “parallel hierarchies”.
The buttons at the top of the elements tab are from left to right: add, delete and search elements, expand/collapse all branches ore only the selected branch, expand the level by number, use a stored subset, set a Format/Style, toogle between show or hide Format/Style, and toogle between hierchical and list view.
Making changes to elements
- Double-click on the name, type, parent element, or weight of an element to change these aspects.
- Base elements can be changed to numeric or string type, but a consolidated (parent) element may not change type.
- Weight can be a positive or a negative decimal number, using the point as decimal separator. A maximum of 8 digits can be stored after the decimal point. The arrow buttons change the weight up or down by a unit of 1.
- Right-click on an element for a context menu with additional options (see screenshot above).
Element types
Elements in the In-Memory DB can be numeric (N), string (S), or consolidated (C).
- Numeric elements can only contain numbers. They can be used for calculations, e.g. for consolidations.
- String elements can contain all characters: (e.g. letters, numbers, special characters). They can be used for comments. They cannot be used for calculations.
- A consolidated element is a parent element that has one or more child elements or child levels. With the OLAP Server, you can consolidate both numeric and string elements, but only consolidated elements based exclusively on numeric child elements will be calculated.
Note: for older versions of Jedox, it is not recommended to use the format yyyy.mm for the month dimension, as the elements are treated as numeric when performing drillthrough.
Consolidation calculations
Consolidated element = Child1 * weight + [Child2 * weight + …]
A prerequisite for the calculation of a consolidated element is that all child elements must be numeric or consolidated with a numeric value.
Drag-and-drop operations
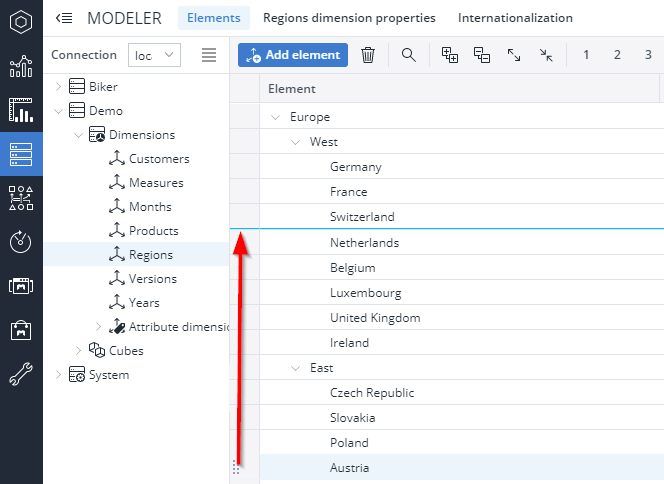
For example you can move in "Demo/Regions" the country "Austria" from "East" to "West". After this action "Austria" will be automaticly consolidated in "West":
To mark several elements, press the Shift or Ctrl key while clicking on the elements and hold the grabbing hand to start the drag operation.
While dropping you can press the Shift key to indicate a “Move” operation or the Ctrl key to indicate an “Add” operation. While pressing the key, a tooltip is shown, hinting the currently chosen action. The additional key must be held down at the moment when drop occurs in the target area.
You can drop the element(s) between two elements in the grid (visualized by a blue line) or on top of an element (visualized by light blue background). If you drag the element on top of a collapsed consolidated element and hold it there for one second, the element will be expanded.
Longer trees that extend beyond the screen will automatically scroll when the cursor reaches the bottom of the screen.
Drag-and-drop functionality is also possible when paging is used, either in flat view or in tree view. To drag across pages, the mouse cursor is dragged on a paging control (button) and held there for one second. The UI will then change to the next/previous page.
In list view, elements may only be reordered using drag-and-drop functionality.
If you drop without a shortcut key being pressed at same time, you receive a menu with Add, Move, and Cancel buttons. Not all of these actions are applicable for all drop positions. Inapplicable actions are disabled in the menu.
- Add: this button is only active if the drop zone is either on top of an existing element or within a dimension hierarchy branch to which none of the selected/dragged elements currently belong. Selecting Add will define the elements as children of the element or element branch on which they are dropped. The elements will also remain in their existing hierarchy position (i.e., a parallel hierarchy is created).
- Move: this button is always active. If the drop zone is within the same hierarchy branch, elements will be only reordered within the consolidation order. If the drop zone is on top of an element or within a different hierarchy branch, selecting Move will remove the elements from their current hierarchy position.
- Cancel: this button is always active. It cancels the drop operation.
When adding or moving an element, a popup warning appears, as changing an element from base to consolidated type may imply loss of data.
Updated July 21, 2025


